Search

Sal's Flamenco ~ Neck


Head crest is finely shaped & scraped to the desired profile.


Tuner holes drilled with hand drill and my steel tuner drill jig.


End slots of 15mm are being spade drilled.

Sal's Flamenco ~ Neck

Headcrest
Excess headcrest sawn close to profile with coping saw.

Headcrest shaping
Shaping has begun... this is headcrest shape of the 1933 Santos Hernandez

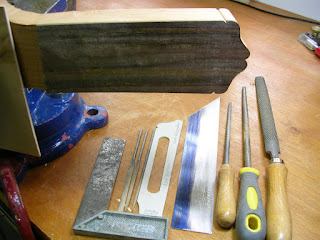
Headcrest shaping tools
Some of the tools involve in shaping the head crest are (from left) : try square; needle files, template (for tracing on headplate), scraper, round files and a rasp. The headcrest is awaiting final shaping and sanding.

Sal's Flamenco ~ Neck


Heelcap awaiting to be chiseled to shape.


Heelcap faceted in stages.


Final shape achieved and scraped smooth. You can see the 3 tools I use for shaping, sitting on the bench vise: 1" chisel (wooden handle), a razor blade (red handle) and a steel scraper (under the razor blade).


Spanish Cedar is enjoyable to work on and gives a sweet aroma to the studio :)

Sal's Flamenco ~ Neck


Someone asked me if it's possible for the heelcap to be less "poking"...
...déjà vu...


Now sawing the neck for the new heelcap design.

Sal's Flamenco ~ Sides


Sides are planed thin for more responsiveness of a flamenco guitar.

Guitarmaking

Using your hands to create something, like all forms of expression, is therapy to one. Building a guitar, is therapy to many. First the maker. Then the player. Finally the listeners.
Ngoh Thiam Meng

Sal's Flamenco ~ Back


The handplane weighs it down while the clothe peg wedges gives a nice lateral push for good glue joint.


Paulownia back edge shot, getting ready to be glued.

Sal's Flamenco ~ Top


Top glued on jointing board. Will leave it overnight, as it's late now. Be home early to rest well for my son's playgroup orientation tomorrow morning and an afternoon in-camp briefing.

Picea engelmannii Engelmann Spruce Guitar Top
Top is being shot for a perfect glue joint.

Shooting the top
Spruce top that has been sitting in the workshop for a few years.

Paulownia, an alternative tonewood for nylon string guitars

On hindsight, after building a traditional fan-braced classical guitar with paulownia, the fair coloured, resonant timber, like Felipe Massa in the first ever F1 night race in Singapore, has finished the qualifiers and takes pole position in a bid to be a universally (at least in my workshop) accepted alternative tonewood for guitars. For this, the finals will be decided after two more builds:-

(1) Rosewood back/sides with Paulownia top ; and
(2) Paulownia back/sides with Spruce/Cedar top.

The guitar top being the main tone producer, the 2008 Ngoh guitar's tone (Paulownia back/sides/top)is unlike what you would expect from the traditional Spruce or Cedar. Perhaps with a body resonance at low E, the basses are highly favoured and the trebles becomes dull and percussive, giving the trebles a truely oriental colour. (Hear an audio except.) It has a potentially powerful tone and wide colour ranges, though, with full persuasion from the player. It would be interesting to see how a Rosewood side/back will work with a Paulownia top, in final build (1). I wish for a longer sustain though. Maybe adding a soundport might help, by lowering the body resonance and a thicker kerf lining at the tail end. But in any case, it's a blessing to know that Paulownia will make a fantastic Flamenco guitar. This we'll see after final build (2).

Whatever happens, for sure Paulownia will finish the finals with flying colours, with the fuel line where it's suppose to be. If not a podium finish, at the very least a personal best in its inaugural race in the nylon string circuit!

Till then, subscribe.

Stop reading, get your guitar out and practise.

Keep the music alive.

Guitar Repair #2 - Setup - Yamaha CG-101 - Classical

Adjusted nut and saddle action for great playability to the delight of the student.

This was to be my first setup of many to come.

One of the most meaningful work in guitar.

This is a vital skill for a guitar luthier that turns him/her from a woodworker to a guitarmaker!

5/11/21
I was going through my repair blog entries.
Many early guitars like this wasn't photographed properly, if at all.
I wish I did.

Sal's Flamenco ~ Neck


Here's a lovely rosewood blank for the headplate, surface prepared for gluing.


On the other face, the headcrest is drawn and trimmed to neck size.


The headplate is being glued to the neck.


After glue was set, the headplate is planed for a fresh surface to re-layout the new head outline.


The edges are roughly cut with a coping saw.


The edges are trued with a block plane.

Sal's Flamenco ~ Neck


The slots are sawed on either side of the heel block. These slots, separates the heel block in two parts, the heel and head block (which will live inside the guitar). The slots are cut twice with a backsaw to widen the gap to 0.08", which will receive the sides later.


The slot cut is 1/16" offset from the 12th fret. The web (the centre gap which is not cut) distance is 10mm.


The head block is reduced to dimension: 40mm with a backsaw.


After some sanding with #110.

Sal's Flamenco ~ Neck

Spanish Cedar neck assembly
Clamps removed from neck assembly.


Excess neck is being sawed flush to the heel block.


A bit of dressing on the side of heel block with bench plane.


The height of the heel block is brought to correct dimension.


The centre line determined; profile of fingerboard is also drawn unto the neck (61mm at the 12th fret, tapering to 50mm at the nut). Classical guitars, however, are usually about 52mm at the nut, which makes the flamenco a little easier on the left playing hand.

Sal's Flamenco ~ Neck


The Spanish Cedar heel block is being glued to the neck shaft.
I'll be shifting in a few days to another studio on the first floor. It'll take a little time away from this guitar...

ps: pardon the quality of my photos. Think I need photography lessons :(

Sal's Flamenco ~ Neck


Today, my landlord broke some heart wrenching news that someone else has offered a higher rent for this studio where I'm working from. It's very sad just thinking about having to leave this studio, let alone the time and effort to find and move to another. I have a month to do just that. But instead of feeling nostalgic, I decided to stay on the side of faith, knowing that all things will work for good for me. I called up an acquaintance and immediately went to view of his commercial properties. Then I came back to the studio to glue up the neck.

Sal's Flamenco ~ Neck


This quartersawn neck blank (26" long) is the fragrant Spanish Cedar, which has been sitting in my studio for almost 3 years. Sal, you'll enjoy this scent everytime you open the guitar case!


With a simple setup, the blank is sawed at the 15 degree angle for the head/neck scarf joint.


I don't have a sharper back saw deep enough to complete the cut, so the steel backing removed to cut through the blank.


A steady cut can give you a good result, even by hand.


To get a good gluing surface, the pieces are stacked to be handplaned (I used the bigger metal plane in the background, a bench plane).


Between each hand planing, the surface is checked with a square edge to achieve flatness in all directions while maintaining the 15 degree angle.